Creating a Login System Download Sample Source Code

Greetings, and welcome back to FreeASPHosting.net trainings with ASP.NET. In this tutorial, we will go through the steps of setting up an Authentication system, or simply put “Login System”.
In order to help you get started quickly, we have prepared a “getting started” package, that you may freely download.
Prerequisites
This tutorial is very simple, but assumes that you already have the following:
Visual Studio 2015 or newer installed on your machine.
Microsoft SQL Server Management Studio.
An Account at FreeASPHosting.net. If you don’t have one already, please subscribe here.
This tutorial is very simple, but assumes that you already have the following:
Visual Studio 2015 or newer installed on your machine.
Microsoft SQL Server Management Studio.
An Account at FreeASPHosting.net. If you don’t have one already, please subscribe here.
Adding the Login System
1 Creating a Database
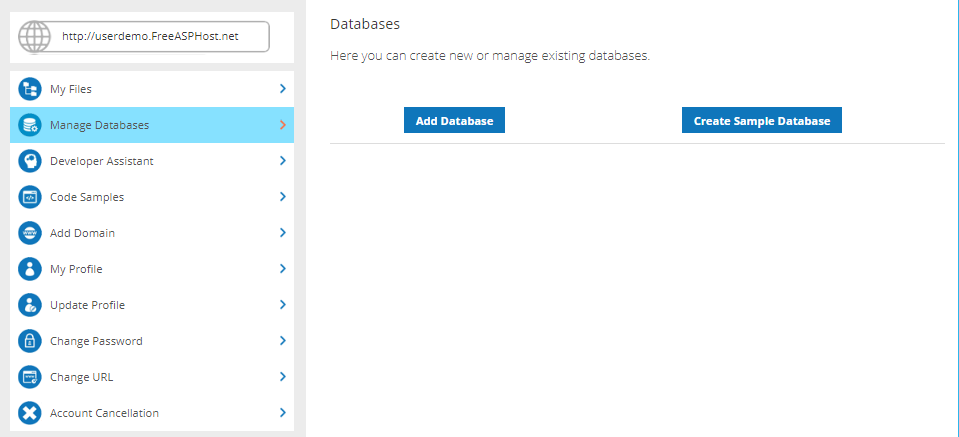
First, login to your FreeASPHosting.net Account. From the Dashboard, on the sidebar, click on “Manage Databases”
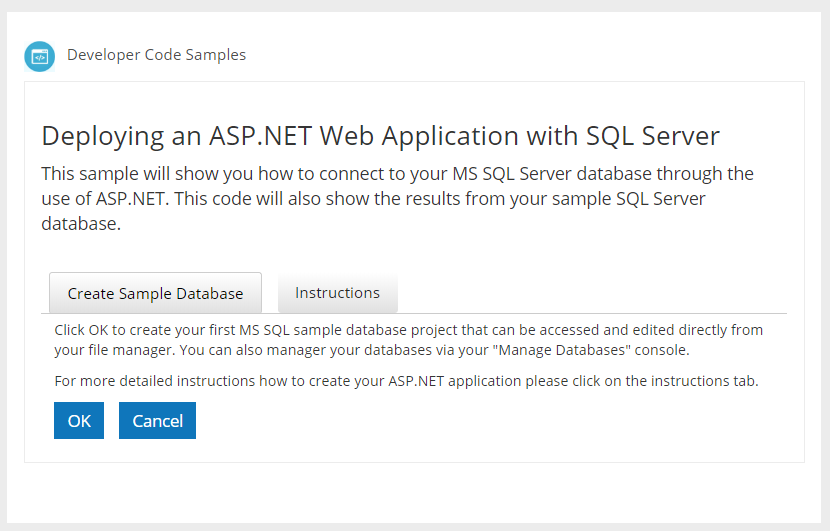
Next, click on the “Create Sample Database” button, make sure the “Create Sample Database” tab is active, then press “OK” to proceed.
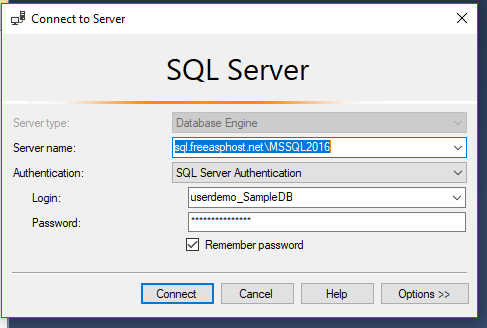
2 Setting up Microsoft SQL Server Management Studio
Start your SQL Server Management Studio (SSMS). Use the data from your Sample database to login. You will need the following:
- Server Name
- Username
- Password
Once you are done, click on “Connect” to proceed.
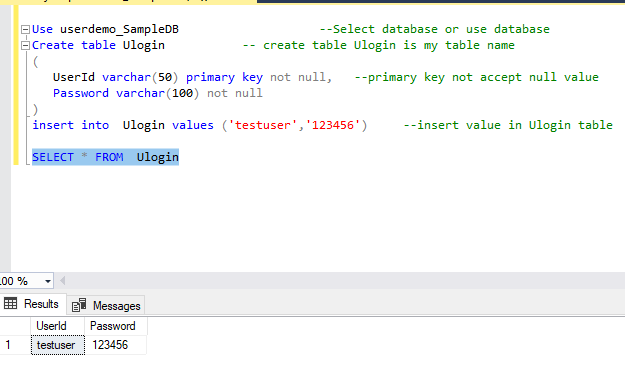
3Creating the Database Schema
Now it’s time to create the tables that will hold the user data. Open the query panel and paste the following code. This SQL query simply creates a Table called “Ulogin”, with a couple of fields: UserId and Password. Then it creates a test user with username “testuser”.
  Use userdemo_SampleDB      --Select database or use database

    Create table Ulogin        -- create table Ulogin is my table name
    (
        UserIdvarchar(50) primary key not null,   --primary key
        Password varchar(100) not null
    )

insert into  Ulogin values ('testuser','123456') --insert value in Ulogin table
4The Code
Now that we have set the database, it’s time to start working on the ASP.NET code. We will be using a simple design to illustrate how the login page will work, as the purpose of this tutorial is demonstrating the Authentication system basics. So let’s open Visual Studio.
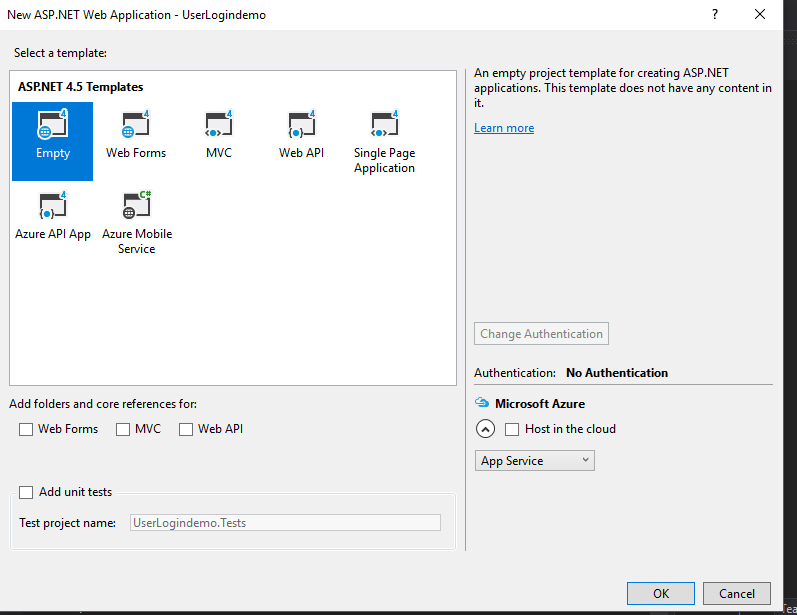
Create a new project, by selecting the “ASP.NET Web Application” template from the list of the available project types.

On the next window, select an the “Empty” template
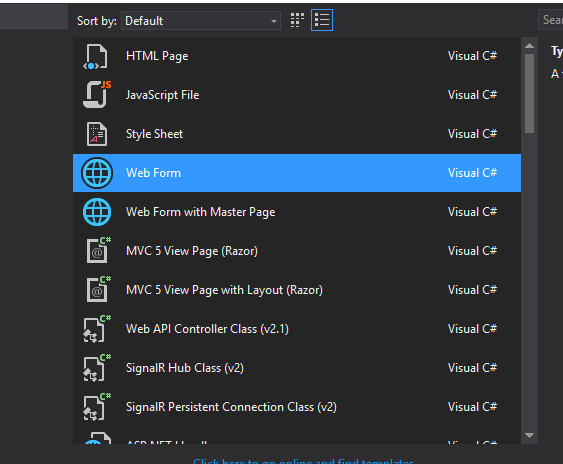
Next, add a “Web Form” to your project.
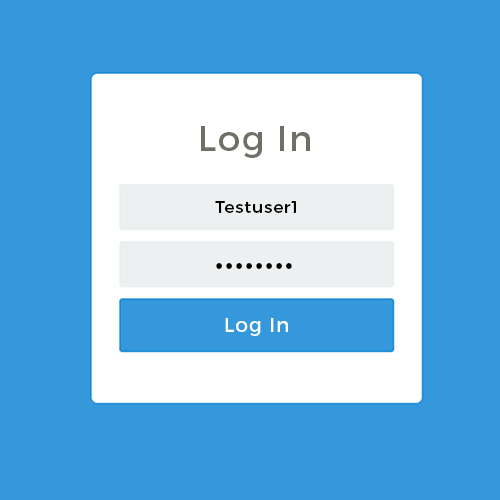
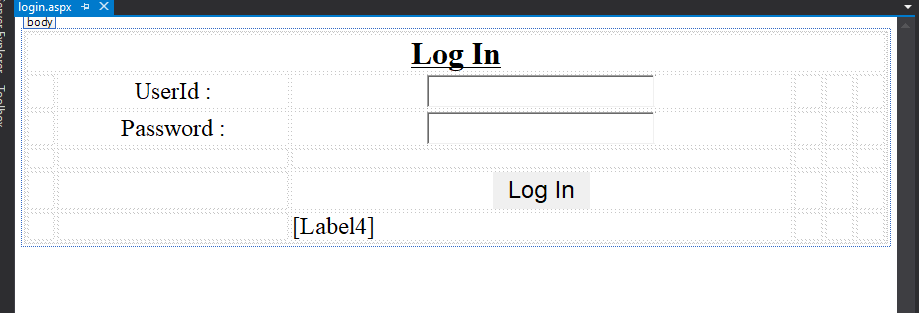
At this point, we may start designing our login.aspx page. To lay the different elements on the screen, we will be using a Table. If you feel like making the elements in the middle of the screen, use the Table properties and set the text-align style property. Next, from the Toolbox, drag two labels, two textboxes and a single button, as illustrated in the sources code and image below. The labels and textboxes are used for the login and password respectively. The button will be used to submit the form’s content to the server for processing.
<%@ Page Language="C#" AutoEventWireup="true" CodeBehind="login.aspx.cs" Inherits="UserLogindemo.WebForm1" %>

<!DOCTYPE html>

<html xmlns="http://www.w3.org/1999/xhtml">
<head runat="server">
<title></title>
<style type="text/css">
.auto-style1 {
	width: 100%;
}
</style>
</head>
<body>
<form id="form1" runat="server">
  <div>
    <table class="auto-style1">
      <tr>
        <td colspan="6" style="text-align: center; vertical-align: top"><asp:Label ID="Label1" runat="server" Font-Bold="True" Font-Size="XX-Large" Font-Underline="True" Text="Log In "></asp:Label></td>
      </tr>
      <tr>
        <td></td>
        <td style="text-align: center"><asp:Label ID="Label2" runat="server" Font-Size="X-Large" Text="UserId :"></asp:Label></td>
        <td style="text-align: center"><asp:TextBox ID="TextBox1" runat="server" Font-Size="X-Large"></asp:TextBox></td>
        <td></td>
        <td></td>
        <td></td>
      </tr>
      <tr>
        <td></td>
        <td style="text-align: center"><asp:Label ID="Label3" runat="server" Font-Size="X-Large" Text="Password :"></asp:Label></td>
        <td style="text-align: center"><asp:TextBox ID="TextBox2" runat="server" Font-Size="X-Large" TextMode="Password"></asp:TextBox></td>
        <td></td>
        <td></td>
        <td></td>
      </tr>
      <tr>
        <td></td>
        <td></td>
        <td></td>
        <td></td>
        <td></td>
        <td></td>
      </tr>
      <tr>
        <td></td>
        <td></td>
        <td style="text-align: center"><asp:Button ID="Button1" runat="server" BorderStyle="None" Font-Size="X-Large" OnClick="Button1_Click" Text="Log In" /></td>
        <td></td>
        <td></td>
        <td></td>
      </tr>
      <tr>
        <td></td>
        <td></td>
        <td><asp:Label ID="Label4" runat="server" Font-Size="X-Large"></asp:Label></td>
        <td></td>
        <td></td>
        <td></td>
      </tr>
    </table>
  </div>
</form>
</body>
</html>
The login form should look like the following, as described earlier, the couple of inputs (textboxes) will be used by the user to type account credentials.
Before going any further with the code, we should connect our ASP.NET application to the database server. In order to do that, we should create a Connection String. In the Solution Explorer, browse down to the web.config file, and add the following Connection String :
<connectionStrings>
	<add name="mycon" connectionString="Data Source=sql.freeasphost.net\MSSQL2016;Initial Catalog=userdemo_SampleDB;Persist Security Info=True;User ID=userdemo_SampleDB;Password=YourPassword" providerName="System.Data.SqlClient" / >
</connectionStrings>
Now, we can add the code that will handle the connection process, open login.asps.cs in Visual Studio, and insert the following code:
usingSystem.Data.SqlClient;
usingSystem.Configuration;
Then, let’s create an SQL connection object. The Connection’s name should be the same as the one in the web.config file. In this case: “mycon”.
SqlConnection con = new
SqlConnection(ConfigurationManager.ConnectionStrings["mycon"].ToString());
Remember that login button we created on the page’s design? Now it’s time to make it work, by adding a click event handler as illustrated in the following code:
protected void Button1_Click(object sender, EventArgs e)
{
try
{
stringuid = TextBox1.Text;
string pass = TextBox2.Text;
con.Open();
string qry = "select * from Ulogin where UserId='" + uid + "' and Password='" + pass + "'";
SqlCommandcmd = new SqlCommand(qry, con);
SqlDataReadersdr = cmd.ExecuteReader();
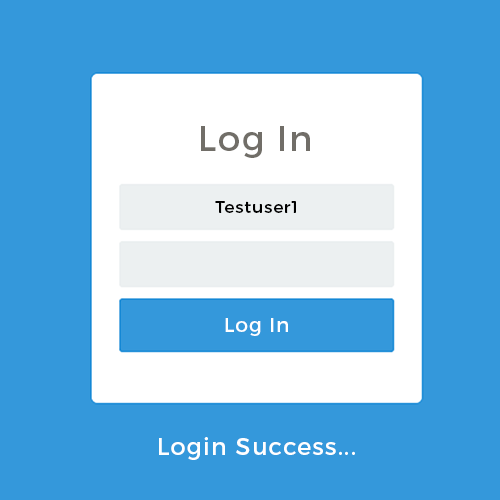
if (sdr.Read())
{
Label4.Text = "Login Sucess......!!";
}
else
{
Label4.Text = "UserId& Password Is not correct Try again..!!";
}
con.Close();
}
catch (Exception ex)
{
Response.Write(ex.Message);
}
}
The code is very simple to understand, the “Button1_Click” method is triggered when the user presses the login button. Once inside, we retrieve the account credentials typed by the user from the TextBox objects.
Then we simply check the database, through a simple “SELECT” query, if a user with that login AND password exists. If the check passes then the login succeeds.